Sanding Sequences That Deliver a Flawless Parquet Finish
Parquet floors are little works of geometric art—herringbone, chevron, basketweave—each block a tessellated fragment of history underfoot. But years of renovations often leave a mess beneath: tarry black bitumen from the mid-20th century, stubborn carpet glue from the 1990s, pressure-sensitive adhesives from office tiles, or a cocktail of all three. Before you sand, stain or seal, the first job is cleaning back to honest timber. That’s where disciplined preparation pays off—what follows is your field-tested blueprint for bitumen and old adhesive removal, plus the essential Prep Steps for Perfect Parquet that set up a flawless finish.

Why the messy layer matters (and how it sabotages finishes)
Bitumen and legacy adhesives don’t just look ugly; they undermine the mechanics and chemistry of restoration.
- Poor bond for modern finishes: Oils, lacquers and hardwax products need clean, absorbent wood. Residues act as a release agent, leading to patchy curing, soft spots, or premature peeling.
- Gumming and glazing abrasives: Adhesive warms up under friction, melting onto sanding belts and discs. You burn through consumables faster and risk heat marks.
- False flatness: Blobs of glue create high points; you’ll chase “phantom” ridges that mysteriously reappear once the adhesive softens or deforms.
- Trapped moisture and odours: Bitumen is occlusive. Hidden damp lingers, musty smells persist, and wood movement becomes unpredictable.
In short, skipping deep prep means you gamble your time, budget and reputation. A clean, bare substrate is non-negotiable—and it’s achieved by following rigorous Prep Steps for Perfect Parquet from the very first inspection.
Step 1: Diagnose what you’re dealing with
Every parquet is a crime scene; identify the culprit before you reach for tools.
Quick identification guide
- Bitumen (asphaltic adhesive): Jet-black, brittle when cold, smears when warm, often found under blocks from the 1930s–1970s. Characteristic tar smell when disturbed.
- Old PVA/animal glues: Brownish, glassy flakes that soften with moisture or gentle heat.
- Carpet tile pressure-sensitive adhesive (PSA): Tan to amber, rubbery, stays tacky; gums abrasives quickly.
- Cutback adhesive blends: Black/brown, semi-elastic, usually under later-applied vinyl tiles or plywood overlays.
Test patches
Choose a discreet area and trial:
- Mechanical scrape: Does it chip crisply (bitumen) or smear (PSA)?
- Gentle heat (heat gun, low setting): Does it soften and release?
- Solvent responsiveness (tiny quantity, good ventilation): Does it gel or resist?
Document results so your crew follows the same playbook throughout.

Step 2: Protect the site and yourself
Adhesive removal is messy by design. Good containment and PPE keep things safe and efficient.
- Containment: Zip-doors, taped thresholds, and poly sheeting over built-ins. Negative air if possible.
- Dust management: H-class extraction, sealed vac hoses, and frequent filter changes.
- PPE: Cut-resistant gloves, safety specs, organic-vapour respirator when using solvents or heat, and knee protection.
- Waste plan: Sturdy contractor sacks, absorbent granules/used rags double-bagged, and a labelled tub for metal blades and nails.
- Floor mapping: Mark lifted or hollow blocks with chalk. You’ll revisit these after the heavy removal phase.

Step 3: Mechanical removal first—always
Whenever you can, go mechanical before chemical. It’s faster, cleaner, and kinder to finishes downstream.
Tools that earn their keep
- Heavy-duty floor scraper with replaceable blades (pull-stroke type for control).
- Oscillating multi-tool with wide scraper blades for edges and thresholds.
- Scarifier/renovation mill (with TCT cutters) for heavy build-ups on slabs once blocks are out.
- Carbide “paint/adhesive” removal discs for angle grinders—use cautiously and flat to avoid gouging.
- Perimeter detailers (e.g., triangular sanders) for corners after bulk removal.
Technique tips
- Work low and slow: keep blade angles shallow to skim residue without diving into fibres.
- Warm stubborn sections with a heat gun to reduce brittleness and encourage shearing.
- Change blades frequently: a fresh edge is cheaper than torn grain.
- Lift & label loose blocks now: stack by row with orientation marks so re-instatement is painless later.
Mechanical removal is the backbone of the Prep Steps for Perfect Parquet: it preserves wood, preserves lungs, and preserves margins.

Step 4: Targeted softening—heat and controlled chemistry
After you’ve taken off 80–90% mechanically, consider targeted softening for the last tenacious film.
Heat
- Infrared plates or a low–medium heat gun ease bitumen without scorching. Keep the tool moving and use a wide scraper to collect the softened layer in one pass.
- Avoid over-heating resinous timbers (pitch bleed) or areas near delicate marquetry.
Citrus-based and alcohol-based gels
- Choose low-VOC, finish-compatible gel removers designed for adhesives, not paint strippers.
- Apply thinly, dwell per manufacturer guidance, then scrape. Immediately follow with white spirit or denatured alcohol wipes to lift residues.
- Finish with a detergent-in-water wipe to neutralise, then allow thorough drying.
What to avoid
- Aggressive caustics that darken tannin-rich timbers (oak, teak) and can haunt your finish.
- Acetone floods: they flash off quickly, draw contaminants deeper, and are a fire risk.
- DIY solvent cocktails: unpredictability now becomes adhesion failure later.

Step 5: Substrate checks—flatness, bond, and moisture
Once the brown/black film has gone, the real inspection begins.
Flatness and integrity
- Lay a 2 m straightedge across multiple axes. Mark highs/lows over 3 mm.
- Tap-test blocks with a nylon mallet; hollow sounds indicate failed bond.
- Check for edge-lift and gaps; note any “creep” where bitumen loss has let blocks migrate.
Moisture
- Use a pin-type moisture meter calibrated for species. For domestic conditions in the UK, you’re typically aiming for 8–11% for most species prior to finishing (project specifics apply).
- Elevated readings? Hold off on finishing. Identify the source (subfloor damp, recent spills, inadequate ventilation).
Adhesion tests
- Lightly hand-sand a small zone and trial your chosen finish or primer. Look for beading, fisheyes, or poor wetting—signs of invisible contamination that need further cleaning.
These checks sit at the heart of professional Prep Steps for Perfect Parquet—they save rework and call-backs.
Step 6: Repairs and re-bonds
Perfect prep means delivering a stable canvas before the machines arrive.
- Re-bed loose blocks: Scrape old adhesive off tongues/grooves. Use a modern MS-polymer parquet adhesive compatible with bitumen traces (many are). Butter the block, press down, weight or pin temporarily.
- Fill voids: For missing blocks, use reclaimed timber of the same species and orientation. Machine to fit; avoid slivers that telegraph later.
- Edge gaps: Reserve resin fillers for micro-gaps; for larger joints, insert properly fitted slips.
- Subfloor anomalies: If the screed beneath has pockets of old cutback adhesive, mechanically abrade and seal with a bonding primer approved over cutback residues before re-bedding blocks.

Step 7: First sands and “clean reveal”
With contamination gone and repairs set, it’s time for a controlled first sand—this is where restraint pays.
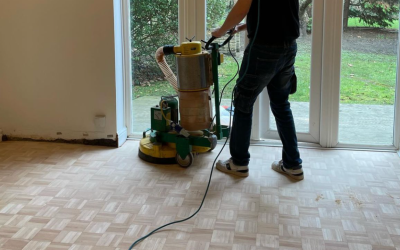
- Start finer than you think: Many pros begin at 60–80 grit on parquet rather than 36–40. You’ve already removed the gunk; now you’re refining wood, not excavating it.
- Diagonal passes on herringbone: Two diagonals to flatten, then with-the-pattern to refine.
- Edge work in sync: Keep edges one grit ahead to avoid dish-outs.
- Frequent vacuuming: Stop heat build-up and improve abrasive cut.
The reveal should show clean, open grain with no dark smears. Any remaining contamination shows up as shiny flecks—spot-treat mechanically or with targeted solvent wipes, then re-sand locally.
Step 8: Fine sanding, colour prep, and dust discipline
The next objective is even scratch patterns and predictable colour take-up.
- Grit sequence: Typical parquet sequences run 80 → 100/120, finishing with a multi-disc (trio) or orbital to close the grain evenly.
- Water-pop (if staining): A controlled mist raises grain for uniform stain absorption. Dry fully before proceeding.
- Dust control: Use anti-static vacs, wipe with tack cloths designed for waterborne systems (if that’s your finish route), and keep foot traffic to a minimum.

Step 9: Finish system compatibility (the chemistry lesson)
Your finish should be chosen for durability, sheen, and feel—but also for tolerance of any minute residues you couldn’t practically remove.
- Waterborne lacquers (polyurethane): Tough, fast, and clear. Many require a barrier primer if there’s any doubt about background contamination; always check technical data sheets.
- Hardwax oils: Beautiful underfoot and repairable; they demand extremely clean wood. Any oily residue from solvents can slow curing—let the floor air and test a small area first.
- Hybrid systems: For example, a shellac-based barrier coat beneath waterborne lacquer can isolate stubborn trace contamination and prevent tannin bleed.
Do a mock-up board or a wardrobe-corner test panel with the full system (primer + finish) to validate sheen, colour, and cure before committing the whole room.

Step 10: The final pass—edges, lines, and lighting
Quality control thrives in bright, unforgiving light.
- Rake lighting: Set a floodlight across the floor at a low angle to reveal chatter, swirls, or witness lines.
- Edge-to-field blend: Feather edges into the field by hand with the final grit. You’re aiming for one continuous plane—not a “bowl” around the perimeter.
- Clean room discipline: Vacuum from skirting to centre, then wipe skirtings and sills to stop dust fall-out onto wet finish.
At this point your canvas is ready, and the Prep Steps for Perfect Parquet you followed will repay you in a glass-flat, even-sheen finish.
Common pitfalls (and how to dodge them)
- Rushing to solvents first: You smear contaminants deeper and multiply risks. Start mechanical.
- Over-heating bitumen: It becomes treacle, spreads everywhere, and stains. Use moderate, controlled heat only.
- Skipping moisture checks: A floor that’s “nearly dry” is a floor that will bite you later with white blush or delayed cure.
- Belts too coarse on parquet: You’ll plough cross-grain scratches that take ages to erase.
- Mix-and-match chemistry: One incompatible primer can wreck an otherwise perfect job. Keep to a tested system.
- Neglecting perimeter detail: Clients notice edges first—treat them like a feature, not an afterthought.
- No test panels: Labelling a small trial area avoids big, visible mistakes.
Toolkit & materials checklist
- Floor scraper with spare blades
- Oscillating tool + wide scraper blades
- Heat gun or IR plate
- Low-VOC adhesive remover gel and neutraliser wipes
- H-class extractor, anti-static hoses, pre-filters
- Angle grinder + carbide adhesive removal disc (for slab work off the timber only)
- Multi-disc/trio sander, edge sander, detail sander
- Abrasives: 60, 80, 100, 120 grit sets
- MS-polymer parquet adhesive, reclaimed blocks, slips
- Moisture meter (pin type), straightedge, mallet
- Barrier primer compatible with chosen finish
- Waterborne lacquer or hardwax oil system (as specified)
- PPE: respirator (A2 or better for solvents), gloves, specs, knee pads

Professional sequencing for teams
- Survey & testing (identify adhesive types, moisture baseline).
- Containment & protection (site set-up, PPE, waste plan).
- Bulk mechanical removal (scrape, lift loose blocks).
- Targeted softening (heat/gel on stubborn films).
- Substrate checks (flatness, bond, moisture).
- Repairs & re-bonds (blocks, gaps, slips).
- First sand (flatten) (diagonals where relevant).
- Fine sand (refine) (trio/orbital finish).
- Clean-down & test panel (primer/finish trial).
- Full finishing system (coats with de-nibbing as specified).
- Sign-off (lighting checks, client care sheet).
This order compresses downtime, avoids rework, and keeps everyone—client included—aligned on what “ready” looks like.
Sustainability and safety notes
- Waste classification: Bitumen isn’t typically hazardous in small domestic quantities, but contaminated rags and solvent waste must be disposed of according to local guidance—log everything.
- Low-VOC preference: Choose products with verified low emissions to protect occupants and installers.
- Noise & neighbour etiquette: Plan the noisiest phases for reasonable hours, and brief neighbours in flats; goodwill matters.
Aftercare basics to hand to your client
A perfect finish still needs a sensible housekeeping routine:
- Cure time respect: Light foot traffic after the manufacturer’s minimum; heavy furniture and rugs only after full cure.
- Entrance mats and felt pads: Stop grit at the door and protect vulnerable legs.
- Neutral cleaners only: No steam mops, no vinegar; microfibre and pH-neutral cleaners keep finishes healthy.
- Periodic maintenance coats: A light abrade and refresh coat extends life dramatically versus full resands.
Providing a simple, branded care sheet turns a great installation into a durable relationship.

Mini case study: from tar-black to gallery-grade
A 1950s herringbone oak floor arrived hidden under two generations of carpet tile and a heavy bitumen layer. Mechanical scraping removed 85% in a day. Stubborn ridges were treated with IR heat and a citrus-based gel, then neutralised. Moisture read 9–10% across the field; six blocks were re-bedded with MS-polymer adhesive. Sanding began at 80 grit diagonally, then 100 and 120 with a trio. A shellac barrier coat was chosen to isolate any microscopic residues, followed by two coats of commercial-grade waterborne lacquer. Rake lighting showed a flawless plane; the client described it as “like new—but warmer.” That outcome wasn’t luck; it was the disciplined application of Prep Steps for Perfect Parquet from the outset.
Frequently asked questions
Will residual bitumen stain the wood permanently?
Usually not, if you catch it early and lift it mechanically before heat spreads it. Where historic staining exists, careful sanding plus a slightly darker stain can even out tone. Barrier primers can also help isolate faint shadowing.
Can I sand straight over old adhesive?
You can try—but you’ll clog abrasives, smear contaminants, and compromise finish adhesion. True quality depends on removal first, sanding second.
Which finish is safest over trace residues?
There’s no universal answer. Many pros favour a shellac-type barrier coat before waterborne lacquer when history is uncertain. Always follow manufacturer data sheets and run a test panel.
What if blocks keep coming loose after removal?
Likely the original bond failed or the subfloor isn’t flat/dry. Re-bed with a compatible modern adhesive and address subfloor irregularities before proceeding.
Is chemical stripper ever mandatory?
Only for thin, persistent films after mechanical and heat methods have done the heavy lifting. Keep it targeted, ventilated, neutralised, and followed by sufficient drying time.
The takeaway
When parquet restoration goes wrong, the culprit is nearly always under-preparation. Work clean, think sequence, and verify each stage before you roll to the next. Diagnose the adhesive, contain the mess, remove mechanically, soften what’s left, verify moisture and bond, repair, then sand with finesse. Choose a finish system that matches the floor’s history, and validate it with a real-world test.
If you want this process handled end-to-end—with zero guesswork and a finish that lasts—follow the same professional pathway we’ve laid out here and lean on the proven Prep Steps for Perfect Parquet.
And if you’re planning a project soon, a quick conversation about your floor’s age, species and adhesive history can save days on site. Speak to an expert who lives and breathes parquet, and make the next set of footsteps across your floor the first step of a new story—quiet, confident and beautifully prepared.